Weekly Blog Post 3: Model Redo
Because of the problems with the Crease Tool, I had to redo the whole model to be able to do a few details that are needed in the model. After redoing this, I cut the different parts that would be detach of the model.
I was also able to same on some of the topology thanks to the separation of all the parts. Now I need to figure out the different parts having all the details that I need them to have.
Aside from the lights and little details on the car, I am on track with the model and seems to be looking very similar to the original. Although
I have a few problems with some of the decorations (since is hard to see them completely because people do not take pictures of those specific parts), as well as having some difficulties with a few sections of the overall car.
I have a few problems with some of the decorations (since is hard to see them completely because people do not take pictures of those specific parts), as well as having some difficulties with a few sections of the overall car.
Weekly Blog Post 2: Camera and fixing topology
This week was a little complicated for me. I had been having some problems with the camera and image plane to be able to continue with the next part of the process, as well as fixing some of the extra topology that my car has and trying to not break the model too much.
One of the first things I did was to reduce the amount of faces and vertices that the model had, since it was too high. I also did some crease lines to keep some sharp ends, without adding more loops into the model.
The major problem I came across with was when I had to use an image plane to synchronize my car with to be able to model with it, since the blueprints are a little misguiding. This took me longer than expected because the videos didn't show any way to do this better or more easy. I ended up eyeballing it to the best of my abilities, since other programs that could have help me where of not use at all either. When I try to used them to fix the camera on a single view, it messed up the rest of the settings of the camera and had to re-do a lot of things since it made Maya crash multiple times.
In the end, I ended up not doing much to the model, but at least I was able to get to a point where the camera could be considered descent to use. I hope that this next week I'll be able to take back the time lost or to prevent this things from happening again.
Weekly Blog Post 1: Car Curve
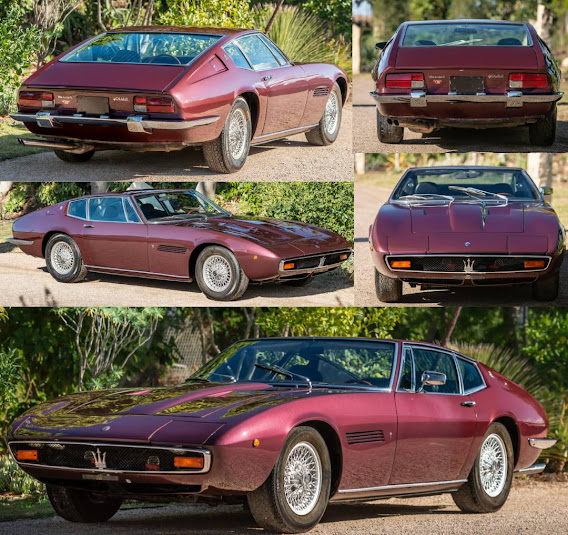
I decided to do my car model from the car Maserati Ghibli Coupe from 1970. I do not know much about cars, but this is a really beautiful car. Since is an old car, it was a little hard to find a lot of blueprints outside form one and other cars of the same brand but different years.
 |
Car: Maserati Ghibli Coupe 1970 |
This is my first week modeling the car. To start with it, I decided to do curves to guide me on the modeling of the car. This was the first time I did this for, so it was a little hard for me to get used to it and to know where to put lines and what could be omitted to have a curve. In the end, I think I did more curves than necessary, but the basic shape of the car is visible and defined enough to start building the car. I also ended up doing a size reference for the actual size of the car so it could be more easy to stay inside the range of measurements for the model.
I also helped myself with doing the curves basing myself in the blueprints for the actual car. This ended up being a bit of a challenge since the blueprints did not align perfectly with each other because they hade a bit of a difference in side and what it seems to be a model (as seen in the image). This made some of the curves to not collide with each other perfectly, which gave me some difficulties in the long run.
Next, I just added some pipes and and cylinders to create the wheels of the car. I size them to the same levels and height as the reference of the image. This was just to have the wheels into consideration for when I started to map out the car, and to get a better view on how it would look when done.
Finally, I finished half of the map out of the car. Since I'll mirror this, I just needed half of the car for it. Since the blueprints are not completely align, it was a little hard to make all the pieces look good. I wanted to create a new reference camera with the real image of this car, but I was not able to do it in the end, so I had to stop on this part until I was able to figure out how to do it. Although it seems to have the right shape and curves than the real car.


No comments:
Post a Comment
Note: Only a member of this blog may post a comment.